用Astro無痛code出自己的部落格:用API建立文章列表
網頁開發者還在煩惱該怎麼建立自己的個人網站嗎?快來試試Astro,這款打造個人部落格/作品集的神器吧!

文章目錄
前言
先前關於Astro框架的推坑,都僅止於局部的介紹,總覺得搔不到癢處,所以這回就直接動手,實際從專案來更進一步了解Astro吧!
接下來會初步運用到Astro的API來建立功能。
什麼是API?
API全名為應用程式介面(Application Programming Interface),它是軟體的橋樑,讓不同開發者寫的程式能夠彼此串聯在一起運作,而不會彼此衝突。
簡單來說,API就是開發者們事先定義好,各自開發好的程式該如何互動的規則。
我常常將這個概念想像成接水管,如果雙方對該怎麼接、街口該長什麼形狀、水會怎麼流沒有共識,那這個水管一定沒辦法接起來。
反之如果雙方對整個管路的設計、水流方式都完全清楚沒有疑義,那這個水管系統順暢運作不過就是水到渠成的事了。
而在使用框架,就是在別人構築好的軟體基礎上進行開發。
API就是框架所提供,已經封裝好的函式或特定的語法功能。
在初步了解完API是什麼後,接下來我們會從安裝完Astro之後開始實作,如果你還不清楚Astro的安裝,可以先看第一篇的介紹:
專案架構
專案架構的起手式如下:
├── public
├── src
   ├── assets
   │    └── astro.svg
   │    └── background.svg
   ├── components
   ├── layouts
   └── pages
   │    └── index.astro
   └── styles
        └── global.css
安裝預設在assets資料夾內的圖片可以拿來當範例用,就先留著吧!
開局先新增幾個基本頁面:
├── src
   └── pages
        └── posts
        │     └── index.astro
        └── index.astro
        └── about.astro
這次我們會在posts資料夾當中,存放部落格的內容,並且利用index.astro檔案來建立/posts頁面路由。
其實還有另一種方式也可以:
├── src
   └── pages
        └── posts
        └── posts.astro
        └── index.astro
        └── about.astro
若是.astro檔案的命名與資料夾相同,且存在同一個層級,會被視為路由的進入頁面。
如果以上兩種方式都沒有採用的話,那麼posts路由的頁面會不存在,也就是404 not found。
但你仍然可以訪問資料夾內的其他資源,例如:posts/post-1、posts/post-2,就像以下這樣:
├── src
   └── pages
        └── posts
            └── post-1.md
            └── post-2.md
            └── post-3.md
而這回的專案,我們會採用第一種方式:
├── src
   └── pages
        └── posts
        │     └── index.astro
        │     └── post-1.md
        │     └── post-2.md
        │     └── post-3.md
        └── index.astro
        └── about.astro
然後在Markdown內填入一些範例內文:
// src/pages/posts/post-1.md
---
title: '範例文1'
author: 江森
description: '這只是示範內容'
pubDate: 2025-03-03
image:
      url: ''
      alt: 'cover picture'
tags: ["astro", "blog", "first"]
---

## 第一篇範例文

第一篇範例文的範例內容
至於其他的Markdown的內容都是同樣的套路,放上來會大幅提高本篇的含水量,所以就不放上來囉。
再來我們做個Header當作頂部導航:
---
import astroLogo from '../assets/astro.svg';
---
<header>
	<!-- logo -->
	<div class="logo">
		<a href="/">
			<img
			src={astroLogo.src}
			width="115"
			height="48"
			alt="Astro首頁" />
		</a>
	</div>
	<!-- 站內導航 -->
	<nav class="nav-link">
		<a href="/">首頁</a>
		<a href="/posts">文章</a>
		<a href="/about">關於我</a>
	</nav>
	<!-- GitHub等外部連結 -->
	 <div class="social-link">
		 <a href="https://github.com" target="_blank" rel="noreferrer noopener" >
				<svg viewBox="0 0 16 16" aria-hidden="true" width="20" height="20"
					>
					<path
						fill="currentColor"
						d="M8 0C3.58 0 0 3.58 0 8c0 3.54 2.29 6.53 5.47 7.59.4.07.55-.17.55-.38 0-.19-.01-.82-.01-1.49-2.01.37-2.53-.49-2.69-.94-.09-.23-.48-.94-.82-1.13-.28-.15-.68-.52-.01-.53.63-.01 1.08.58 1.23.82.72 1.21 1.87.87 2.33.66.07-.52.28-.87.51-1.07-1.78-.2-3.64-.89-3.64-3.95 0-.87.31-1.59.82-2.15-.08-.2-.36-1.02.08-2.12 0 0 .67-.21 2.2.82.64-.18 1.32-.27 2-.27.68 0 1.36.09 2 .27 1.53-1.04 2.2-.82 2.2-.82.44 1.1.16 1.92.08 2.12.51.56.82 1.27.82 2.15 0 3.07-1.87 3.75-3.65 3.95.29.25.54.73.54 1.48 0 1.07-.01 1.93-.01 2.2 0 .21.15.46.55.38A8.012 8.012 0 0 0 16 8c0-4.42-3.58-8-8-8z"
					>
					</path>
				</svg>
			</a>
			<a href="https://linkedin.com" target="_blank" rel="noreferrer noopener">
				<svg xmlns="http://www.w3.org/2000/svg" viewBox="0 0 448 512" width="20" height="20">
					<path fill="currentColor" d="M416 32H31.9C14.3 32 0 46.5 0 64.3v383.4C0 465.5 14.3 480 31.9 480H416c17.6 0 32-14.5 32-32.3V64.3c0-17.8-14.4-32.3-32-32.3zM135.4 416H69V202.2h66.5V416zm-33.2-243c-21.3 0-38.5-17.3-38.5-38.5S80.9 96 102.2 96c21.2 0 38.5 17.3 38.5 38.5 0 21.3-17.2 38.5-38.5 38.5zm282.1 243h-66.4V312c0-24.8-.5-56.7-34.5-56.7-34.6 0-39.9 27-39.9 54.9V416h-66.4V202.2h63.7v29.2h.9c8.9-16.8 30.6-34.5 62.9-34.5 67.2 0 79.7 44.3 79.7 101.9V416z"/>
				</svg>
			</a>
	 </div>
</header>

<style>
	header {
		display: flex;
		justify-content: space-between;
		gap: 20px;
		background-color: lightblue;
		align-items: center;
		padding: 8px 20px;
	}

	.logo a {
		display: flex;
	}

	.nav-link, .social-link {
		font-size: 20px;
		font-weight: 500;
		display: flex;
		gap: 24px;
	}

</style>
接著把Header丟進主要Layout內:
---
import Header from '../components/Header.astro';
import "../styles/global.css";
---
<!doctype html>
<html lang="en">
	<head>
		<meta charset="UTF-8" />
		<meta name="viewport" content="width=device-width" />
		<link rel="icon" type="image/svg+xml" href="/favicon.svg" />
		<meta name="generator" content={Astro.generator} />
		<title>從0開始的Astro專案</title>
	</head>
	<body>
		<Header />
		<slot />
	</body>
</html>

<style>
	h1 {
		padding: 0.5rem 1rem ;
	}
</style>
啊!對了,別忘了在主要Layout內引入global.css,然後設定CSS Reset。
/* /src/styles/global.css */

body {
  background-image: url('../assets/background.svg');
  background-size: cover;
}

ul{
  list-style-type: none;
}

a, a:visited {
		color: black;
    text-decoration: none;
	}

a:hover {
    color:deepskyblue;
}
什麼是CSS Reset呢?我們都知道前端開發完的網頁,都是在瀏覽器上跑,尤其樣式的渲染有賴瀏覽器實作。
但是各家瀏覽器在實作CSS時,會有一些的差異,這導致前端開發者好不容易調好的樣式,你在自己的瀏覽器看,真是靚到個一不行,但來到客戶的瀏覽器時,看到的卻是跑板、走鐘。
為了不發生這種慘劇,在手刻CSS時,都要先進行Reset的動作,確保不會因為瀏覽器差異,讓你精心切好的亮眼樣式走鐘。
網上常見的解決方案有,網頁設計圈大神級的人物Eric Meyer整理的版本:
https://meyerweb.com/eric/tools/css/reset/
以及Normalize.css
https://necolas.github.io/normalize.css/
筆者這裡選用Normalize.css。
理由在於,Normalize.css是改善CSS在各家瀏覽器CSS樣式的歧異之處,並且保留可用性高的默認樣式。
簡單來說,比起粗暴地歸零一切,調和歧異與爭端的解決方案總覺得比較Peace一點。
當然如果是喜歡從0開始自己來的人,儘管選用第一個方案,Reset下去吧!
而在normalize.css官網下方也提到,有許多知名的單位組織像是:Twitter, TweetDeck, GitHub, Soundcloud, Guardian, Medium, GOV.UK, Bootstrap, HTML5 Boilerplate等,都選用他們家的解決方案。有這麼多大佬背書,用下去就對了。
所以就直接在MainLayout中用CDN的方式引入:
// /src/layouts/MainLayout.astro
---
import Header from '../components/Header.astro';
import "../styles/global.css";
---
<!doctype html>
<html lang="zh-Hant-TW">
	<head>
		<meta charset="UTF-8" />
		<meta name="viewport" content="width=device-width" />
		<link rel="icon" type="image/svg+xml" href="/favicon.svg" />
		<meta name="generator" content={Astro.generator} />
    <!-- 在這邊引入Normalize.css -->
		<link rel="stylesheet" href="https://cdnjs.cloudflare.com/ajax/libs/normalize/8.0.1/normalize.min.css" integrity="sha512-NhSC1YmyruXifcj/KFRWoC561YpHpc5Jtzgvbuzx5VozKpWvQ+4nXhPdFgmx8xqexRcpAglTj9sIBWINXa8x5w==" crossorigin="anonymous" referrerpolicy="no-referrer" />
		<title>從0開始的Astro專案</title>
	</head>
	<body>
		<Header />
		<slot />
	</body>
</html>

<style>
	h1 {
		padding: 0.5rem 1rem ;
	}
</style>
再將各個頁面放進主要Layout中:
// /src/pages/index.astro
---
import MainLayout from '../layouts/MainLayout.astro';
---
<MainLayout>
	<main>
		<h1>首頁</h1>
	</main>
</MainLayout>
然後我們可以發現,各頁面的大標題,可以使用傳入props到Layout的方式處理:
// /src/pages/index.astro
---
import MainLayout from '../layouts/MainLayout.astro';
---
<MainLayout pageTitle="首頁">
	<div>
		<p>這裡將會放首頁內容</p>
	</div>
</MainLayout>
// /src/layouts/MainLayout.astro
---
import Header from '../components/Header.astro';
import "../styles/global.css";
//取用props
const { pageTitle } = Astro.props;
---
<!doctype html>
<html lang="en">
<head>
<meta charset="UTF-8" />
<meta name="viewport" content="width=device-width" />
<link rel="icon" type="image/svg+xml" href="/favicon.svg" />
<meta name="generator" content={Astro.generator} />
<link rel="stylesheet" href="https://cdnjs.cloudflare.com/ajax/libs/normalize/8.0.1/normalize.min.css" integrity="sha512-NhSC1YmyruXifcj/KFRWoC561YpHpc5Jtzgvbuzx5VozKpWvQ+4nXhPdFgmx8xqexRcpAglTj9sIBWINXa8x5w==" crossorigin="anonymous" referrerpolicy="no-referrer" />
<title>從0開始的Astro專案</title>
</head>
<body>
<Header />
<main>
<!-- 填入props,動態顯示H1 -->
<h1>{pageTitle}</h1>
<slot />
</main>
</body>
</html>
<style>
h1 {
padding: 0.5rem 1rem ;
}
</style>其他放在主要Layout內的頁面也是比照辦理,就交由你們自行處理囉!
生成文章列表
來到這一步,我們已經有了基本的頁面以及一些範例文章,這個Astro部落格已經開始有點樣子了。
接下來要開始進入這一回的重頭戲:利用Astro的API來製作文章列表頁面了。
原先我們建立好的的文章頁面是這樣:
// src/pages/posts/index.astro
---
import MainLayout from '../../layouts/MainLayout.astro'
---

<MainLayout pageTitle="文章">
	<section>
    <h2>文章列表</h2>
		<ul class="post-list">
     	<li class="list-item">
				<a href="/posts/post-1/">第一篇文</a>
			</li>
     	<li class="list-item">
				<a href="/posts/post-2/">第二篇文</a>
			</li>
     	<li class="list-item">
				<a href="/posts/post-3/">第三篇文</a>
			</li>
  	</ul>
	</section>
</MainLayout>

<style>
 	section {
		padding: 0 3rem;
	}
	.post-list {
		padding: 0.25rem 1.5rem;
		font-size: 1.25rem;
	}
	.list-item {
		margin-bottom: 2rem;
	}
</style>
在上面的文章列表部分,我們將替換成Astro的API來生成,就像這樣:
// src/pages/posts/index.astro
---
import MainLayout from '../../layouts/MainLayout.astro'
const allPosts = Object.values(import.meta.glob('./*.md', { eager: true }));
---

<MainLayout pageTitle="文章">
	<section>
      <ul class="post-list">
        <h2>文章列表</h2>
        {allPosts.map((post: any) => <li class="list-item"><a href={post.url}>{post.frontmatter.title}</a></li>)}
  	  </ul>
	</section>
</MainLayout>

<style>
  	section {
		padding: 0 3rem;
	}
	.post-list {
		padding: 0.25rem 1.5rem;
		font-size: 1.25rem;
	}
	.list-item {
		margin-bottom: 2rem;
	}
</style>我們預先建立好的全部文章,會被Object.values(import.meta.glob('./*.md', { eager: true }))語法打包成陣列並賦值給allPosts變數。
在這裡稍微解釋一下這個API語法:
import.meta.glob()是Vite提供的語法,這個語法的作用為使用glob patterns,一次性地引入多個檔案。
首先,Vite是一個現代化的前端建構工具,而Astro的核心是基於Vite建構的,所以可以使用Vite提供的import.meta.glob()語法。
glob patterns是一種用於匹配檔案路徑的模式語法,簡單來說就是使用一種特殊語法來告訴這個函式,你想引入哪些檔案,拿這次的例子來說,import.meta.glob()第一個填入的參數'./*.md'就是告訴這支API函式,我想在相對路徑的同一個資料夾當中,引用所有Markdwon檔案(*.md)。
第二個參數{ eager: true }意思是取消懶加載,立即載入前一個參數路徑所匹配的檔案模組。
懶加載,也就是將使用到才加載的設定關閉,因為我的文章列表的連結需要立即生成並顯示在頁面上,而不是等到有需要時才顯示,所以在第二個參數填入{ eager: true }把預設的懶加載關閉。
最後就是Object.values()語法。
這是 JavaScript 的原生語法,它會回傳陣列。
什麼樣的陣列呢?從Object可以看出,這個語法會需要填入物件,它會將物件中的屬性值取出,然後將這些值組成陣列在回傳,就像這樣:
const object1 = {
  a: "somestring",
  b: 42,
  c: false,
};

console.log(Object.values(object1));console.log最後會印出的是['somestring', 42, false]陣列。
回到我們的專案。
所以allPosts這個變數會是個陣列,最後在下面的ul標籤內,使用陣列渲染的.map方法來生成我們要的文章列表。
如果你有跟著筆者流程,最後完成會是這個樣子:
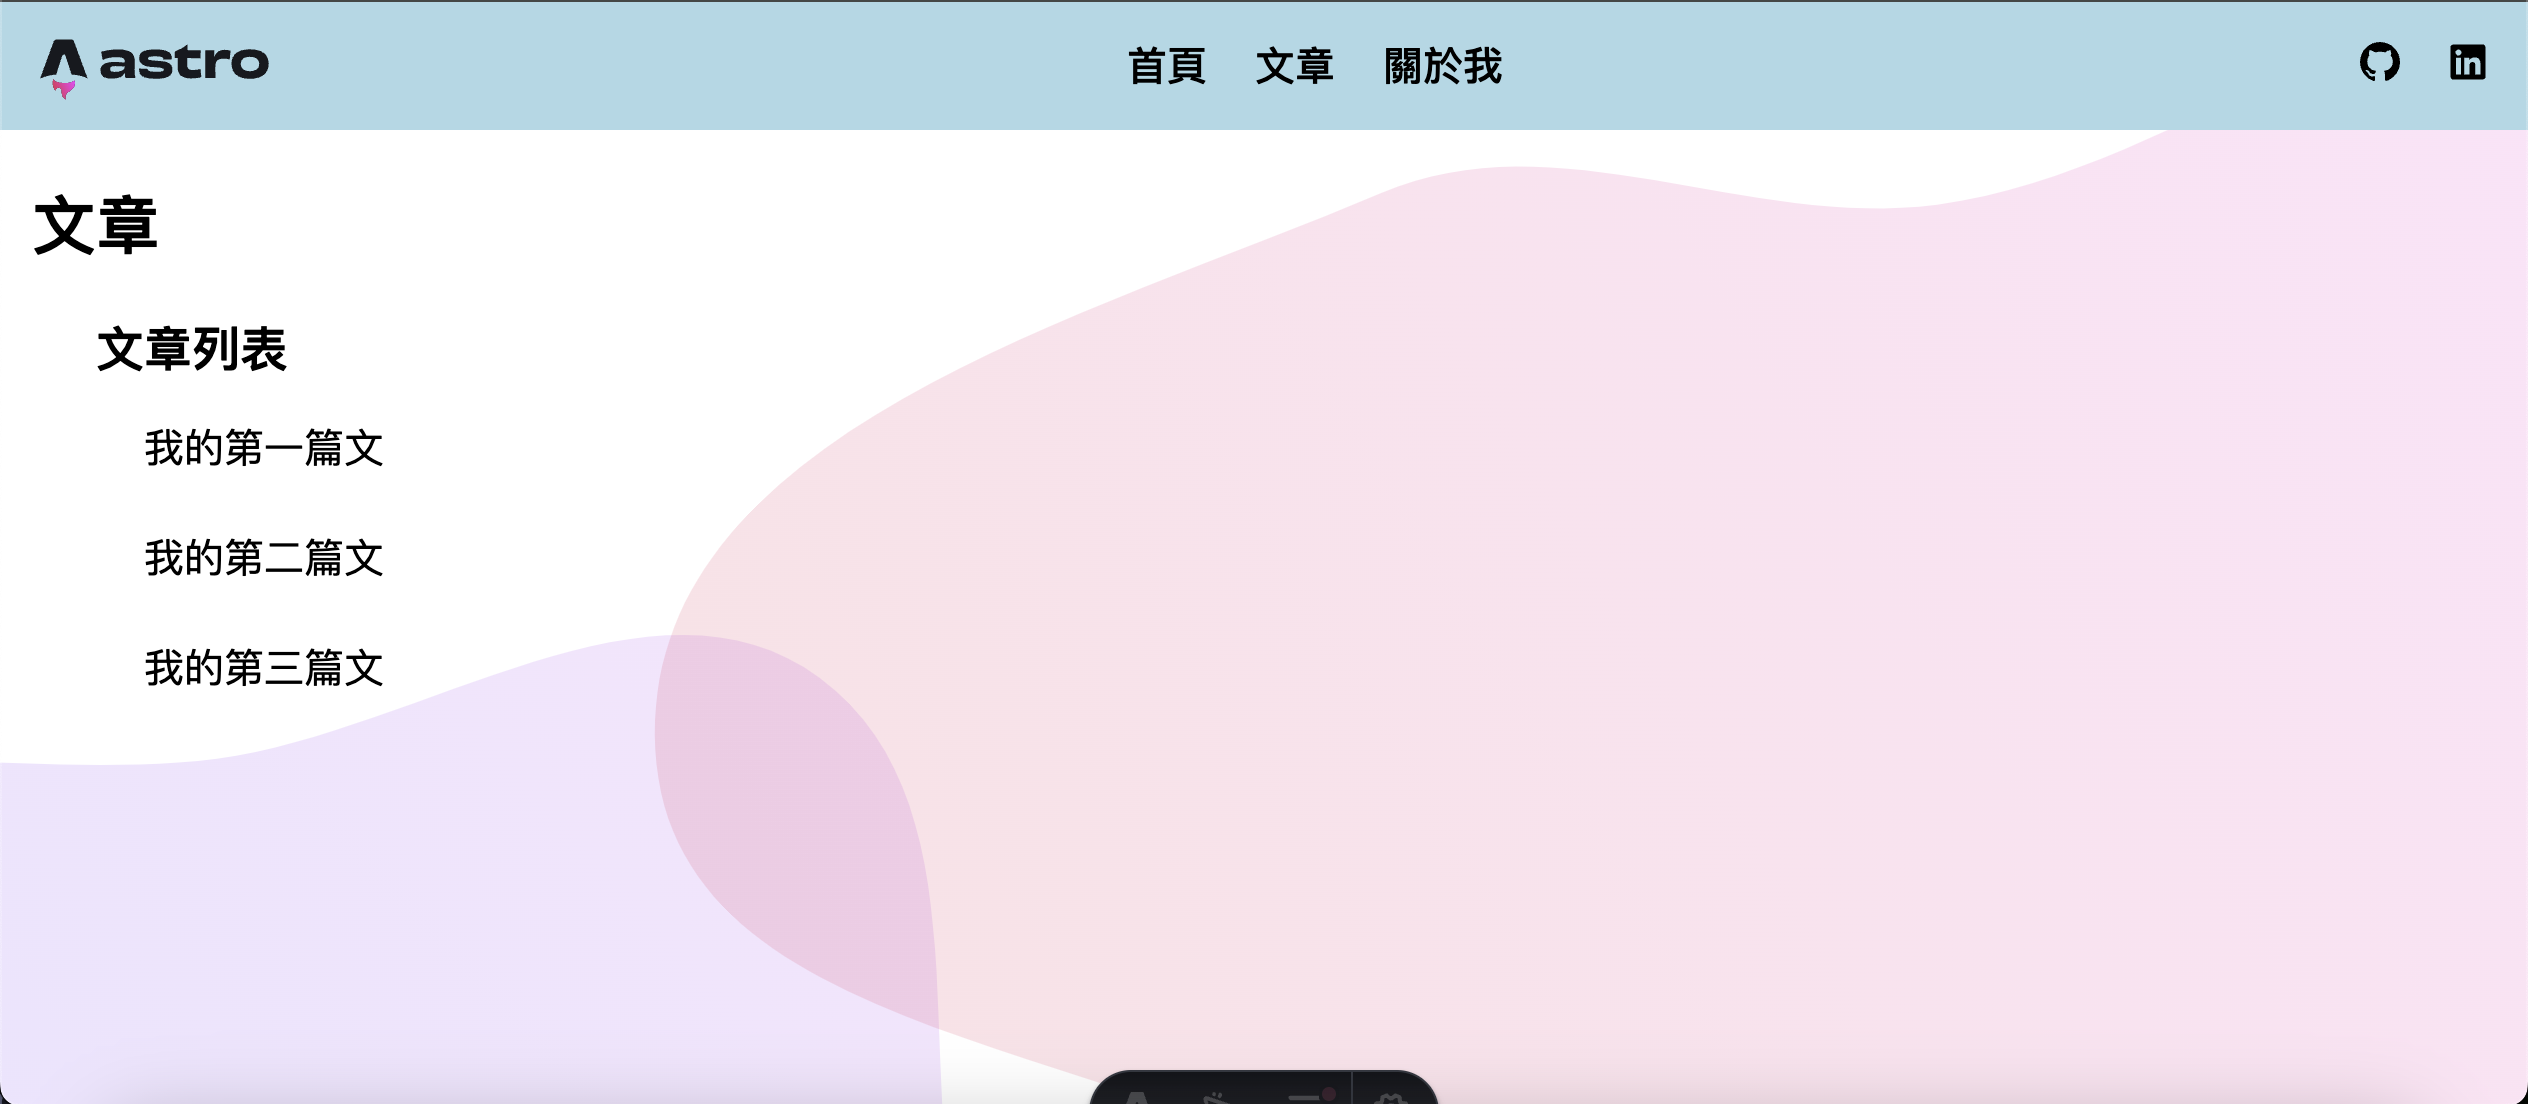
這麼一來我們就成功利用了Asto的API完成一個文章列表的頁面囉~
結語
這一回,我們接續之前的安裝,從0開始,利用Astro建立了一個新的部落格專案。
從架構面的頁面、元件與佈局的建立,再到樣式設定:先Reset再來定義全域、局部的樣式,最後使用Astro的API來建立文章列表。
說到底coding是手藝活,無論看再多文件、概念講解,都比不上動手做一回的印象來得深刻,所以接下來的Astro推坑,我們就按著這個步調,持續完成這個部落格專案吧!